If you spend too much time sorting through meeting invites, system alerts, and automatic replies, it’s time to let automation take over. With New Outlook Rules, you can instruct Outlook to automatically move, categorize, or flag messages based on specific criteria — such as sender, subject, or message type.
Rules are the backbone of a productive inbox. They save time, reduce mental clutter, and make sure that every message goes exactly where it belongs without you lifting a finger.
Why Create Rules by Message Type
Most Outlook users rely on simple filters like From or Subject contains, but power users take it further with message-type rules.
Each email Outlook receives has a “type” — an indicator of what kind of message it is. Examples include a meeting invite, an encrypted email, a read receipt, or a non-delivery notice.
When you create New Outlook Rules by Message Type, you’re telling Outlook to respond based on intent, not just content.
This approach is especially helpful if you:
- Manage a shared mailbox or executive inbox.
- Deal with multiple automated systems and responses.
- Need better separation between real communication and system noise.
Message Type Options and When to Use Each
Type Option | What It Means | When to Use It |
Request for approval | Workflow or system-generated emails requiring your decision. | Move to an “Approvals” folder or flag for review. |
Automatically forwarded | Messages forwarded automatically by another rule or user. | Categorize to monitor compliance or forwarding behavior. |
Automatic reply | Out-of-Office or vacation auto-responses. | Route to an “Auto Replies” folder to declutter your inbox. |
Invitation | New meeting or event requests. | Move to a “Pending Calendar Actions” folder for scheduling. |
Event response | Replies to meeting invites (Accepted, Declined, Tentative). | Automatically mark as read or move to “Meeting Responses.” |
Encrypted | Protected messages using Microsoft Purview or S/MIME. | Store securely in a “Confidential” or “Secure Mail” folder. |
Non-delivery report | Delivery failure or bounce notifications. | Move to “Mail Delivery Issues” for quick troubleshooting. |
Permission-controlled | Rights-managed emails (e.g., Do Not Forward). | Store separately to avoid accidental sharing. |
Read receipt | Confirmation that your sent email was opened. | Send to a “Receipts” folder for easy tracking. |
Signed | Digitally signed messages verifying sender identity. | Archive for compliance or official correspondence. |
Voice mail | Audio messages or Teams call transcripts. | Move to a “Voicemail” folder and review later. |
How to Create New Outlook Rules by Message Type
Follow these steps to set up your first New Outlook Rule by Message Type:
- Open Outlook Settings (⚙️) → select Mail → Rules.
- Click Add new rule.
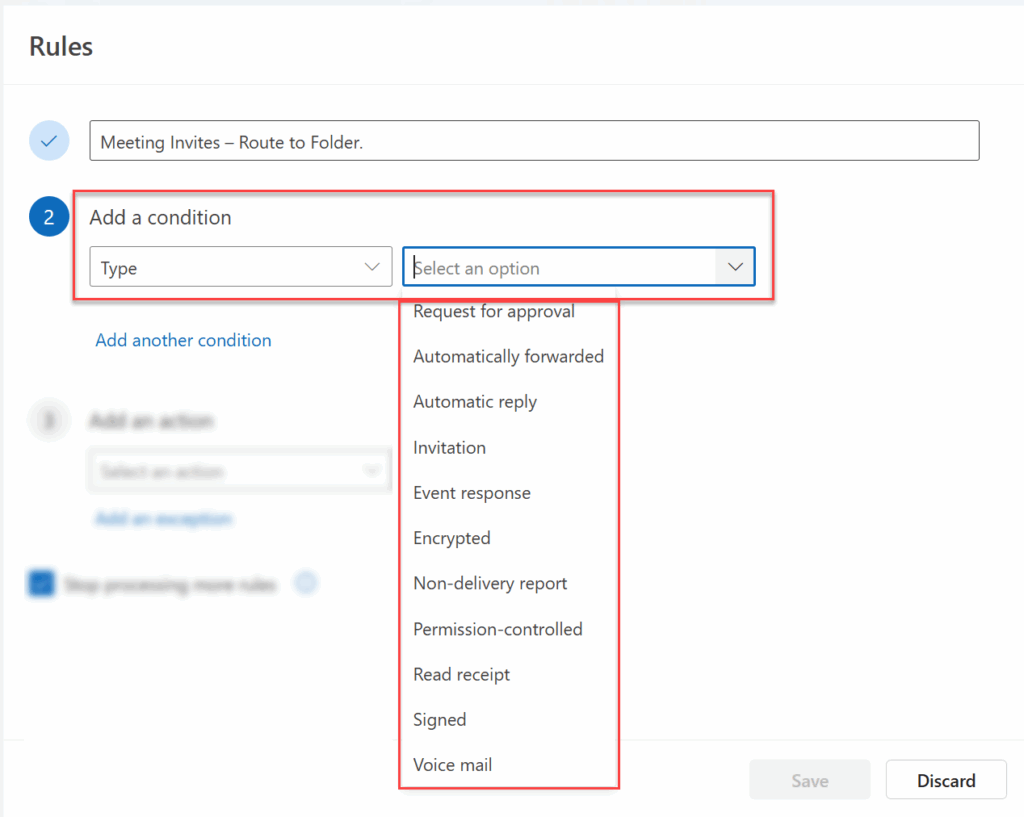
- Name your rule clearly — for example, “Meeting Invites – Route to Folder.”
- Under When message includes, choose Type → select your Message Type (e.g., Invitation).
- Under Do all of the following, select the action (e.g., Move to folder → Meeting Invites).
- (Optional) Add secondary filters such as From contains or Importance = High.
- Click Save to activate the rule.
Pro Tip: Combine Type with Importance or Sender to create hybrid rules that capture exactly what you need — and nothing you don’t.
Before You Go
Creating New Outlook Rules by Message Type isn’t just about organizing mail — it’s about upgrading your workflow. Every automation you build gives you time back, clarity in your inbox, and confidence that nothing important will get buried.
If you want to design advanced Outlook workflows that fit how you actually work, visit our Services page to learn how TRACCreations4e helps teams automate smarter and communicate better.
More Outlook Rules Resources
- Looking to master more automation ideas?
- Explore additional tutorials and resources inside The Vault — your destination for advanced Microsoft 365 workflows and next-level productivity tips.